I recently got a Shelly 1 v3 wifi relay, and I had already decided I did not want to use the Shelly ecosystem but to connect it directly to Home Assistant via ESPHome.
The Shelly 1 relay offers header pins to connect to, for debugging or flashing. Connecting it to a computer requires an USB/TTL converter.
You can either buy it on amazon for cheap, or luckily if you have an Arduino laying around, you can use it as an USB/TTL converter easily!
(I used an Arduino Uno for this. You can use any kind of Arduino, but if you have a clone, you might need to install the drivers.)
You just need to grab a jumper wire and connect the RESET pin to a GROUND pin. That’s it! This way you can use the TX/RX pins of the Arduino to communicate with the Shelly via USB.
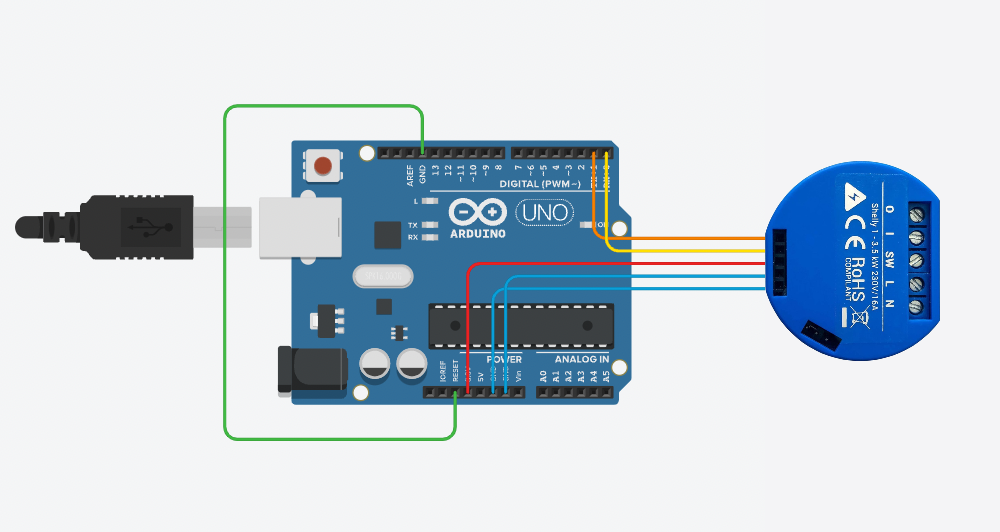
Now you need to wire the Shelly 1. Using jumper wires:
- connect the TX pin of the Shelly to RX
- connect the RX pin of the Shelly to TX
- connect the 3.3v pin of the Shelly to the 3.3v (careful not to connect to the 5V or you’ll fry the Shelly)
- connect GPIO0 and GND to ground.
See the following image for reference.
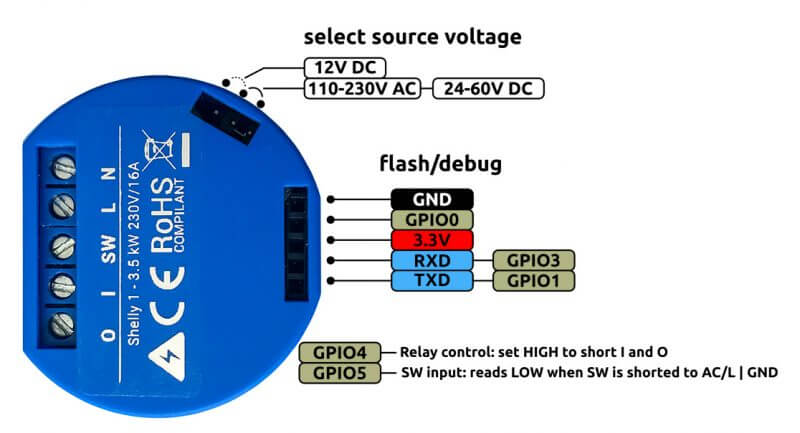
Here is the Shelly 1 pinout.
We’re gonna use the command line version of ESPHome to flash the Shelly, so you need to install it using this command, if you haven’t already. (Needs python 3 installed)
pip3 install esphome
Now you have to create the YAML configuration file for the Shelly. You can use the ESPHome wizard
esphome wizard shelly.yml
Or you can use the one they offer on the website as a template
Note down the device name you used in your configuration, you will need it later.
Now connect the Arduino Uno to your computer, and run
esphome run shelly.yml
If the process is successful, the last lines of the output should look like this
esptool.py v4.4
Serial port /dev/cu.usbmodem21101
Connecting....
Chip is ESP8266EX
Features: WiFi
Crystal is 26MHz
MAC: 98:cd:ac:0c:57:77
Uploading stub...
Running stub...
Stub running...
Configuring flash size...
Auto-detected Flash size: 2MB
Flash will be erased from 0x00000000 to 0x0005dfff...
Flash params set to 0x0330
Compressed 384928 bytes to 269356...
Wrote 384928 bytes (269356 compressed) at 0x00000000 in 23.4 seconds (effective 131.9 kbit/s)...
Hash of data verified.

Leaving...
Hard resetting via RTS pin...
Now unplug the USB cable, disconnect all wires from the Shelly except ground and 3.3v, and plug USB back in. We have no need to transmit data to the computer now, the two wires only serve to power the Shelly chip. The following flashes will be done OTA!
Open your Home Assistant dashboard, and go to Settings > Devices. You should see the new Shelly device! Hit “Configure” and it should be added to the ESPHome integration.
But if you open the ESPHome dashboard on the left menu, it should not yet appear. You just need to create a new device, and as long as the name matches, it should be picked up.
- Click “New device”
- Select “Continue”
- Insert the same name you used in the YAML file, and hit “next”
- Select “ESP8266” as device type and hit “next”
- finally click “skip”
This should create a new device in the dashboard, and it should appear online!
That’s done! Now you can click “Edit” to modify the configuration if you want, and upload it via wifi by clicking “Install”.
For any question come in the telegram channel